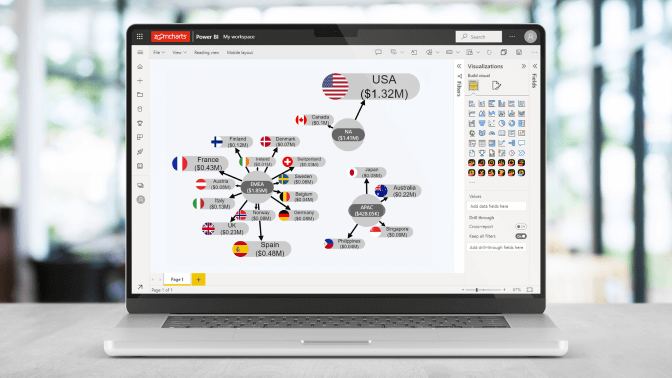
Sep 16, 2021

Using custom visuals to standardize Power BI reports

How do I make sure my Power BI reports end up getting used? The answer is – standardization. In this article, we will go through some standardization tips that will vastly improve the UX of your reports.

Title image
Title image

How do I make sure my Power BI reports end up getting used? The answer is – standardization. In this article, we will go through some standardization tips that will vastly improve the UX of your reports.

When you’re creating reports and dashboards in Power BI, a coherent and standardized user experience is just as important as the data itself. A well-designed report will be more pleasant to use, and the users will save more time when navigating the data and finding what they need. That’s why in this article, we will share some tips on how to standardize your Power BI reports.

What is Power BI report standardization, and why is it important?

The answer is – standardization. A quick Wikipedia search will tell you - standardization means developing technical standards based on the consensus of different parties that include firms, users, interest groups. So, we can gather that the goal of the concept of standardization, at least in a technical sense, is to maximize compatibility, efficiency, and quality through technical decisions that all intended parties agree with. This time, we’re going to take a look at how this can be applied to Power BI custom visuals in the world of interactive data visualization.

Chances are that your report is not going to be used by one single person. And preferably you want your report to be used multiple times in order to retain its relevancy. To guarantee that, you need to ensure a smooth user experience (UX) when it comes to interactive data visualization. And to ensure that, you need to practice standardization in your Power BI reports.

What can happen if you don't focus on standardizing user experience?

Most often a lack of fixation on standardization will lead to UX problems.

UX design issues list

To avoid the above, here’s a bunch of tips and tricks for standardizing user experience in your reports with the help of Power BI custom visuals. 

But before we get to those, remember that building a report is a multiple iteration process. As much as all report creators, from the rookies to the seasoned professionals, try to make it a straight-forward process, it’s going to take a bunch of tries before you get it right.

First, always remember your overall goal - focus on building a report that is going to be used afterwards. To do this, you’ll have to understand who is going to be the end-user, how familiar they are with Power BI, and what were your users using before? Do they have any experience with Power BI custom visuals? Have they ever even thought about the possibilities of interactive data visualization?

Generally, you can divide most intended report users into two groups – more tech savvy and less tech savvy users.

power bi report end users owners

If less tech savvy users are the majority of your intended user base, they’re going to require some catering. There are several ways you can accommodate these cases:

  • Visual switches. We’ve touched on these in our previous post here. These give the user more flexibility by allowing them to switch between views for each chart, as well as tells them what exactly they’re looking at;
  • Running an onboarding session on using the intended Power BI custom visuals can prevent your end-user from getting stuck when exploring your report. Whether it’s a video recording or a live demo of you explaining each element and showing how to use the report, this can save your users from unnecessary hassle. 
  • Info page or help sections. We also briefly discussed these in our previous blog post. You can do this by creating a separate overlay that explains all the switches, or just simply a separate file that defines all buttons, symbols, etc.

power bi report that satisfies end user requirements

Second, when it comes to interactive data visualization, don’t be afraid to start a conversation with your end-users. Explain to the user how you’re building the report. Go over what interactions the user wants, how you can implement requested features, what to expect from your report, what kind of Power BI custom visuals you'd like to use etc.

This will help make sure your report gets used in the long-term and avoids the chance of the user transitioning to something else out of convenience – our goal is for our report to be that convenience for them, especially in the world of business data visualization.

Power BI Custom Visuals as a standardization practice

Selecting multiple visuals at the same time can prove to be a problem for native Power BI visuals, as regular Power BI doesn’t support chart highlighting and cross-chart filtering at the same time. Generally, most report creators would agree that filtering is a great asset to interactive data visualization, as it allows for far more functionality. 

power bi custom visuals vs power bi standard visuals

It can also be tricky to activate and select certain interactions within default Power BI, which makes the end-user click between selecting and de-selecting a lot. Click on one, hold CTRL, click again. All these actions amount to unnecessary clicks.

This is where Power BI custom visuals can help you. With ZoomCharts, the core functionality is filtered. Every highlight or click is essentially an extension of the previous selection. So there’s no need to activate any interactions, you can simply click and drill down.

drill down power query for power bi

This is one way how ZoomCharts aims to grant the experience of truly navigating data, instead of looking at available snapshots. That’s the quality which can make or break interactive data visualization.

tip to ux improvement for power bi

This next section is going to look at some Power BI custom visuals and see how these can be tweaked in favor of standardization and ease-of-use for the end-user, thus utilizing the full potential of these visuals and make interactive data visualization a smooth experience.

Donut chart

Ah yes, in the world of interactive data visualization, this is the visual that can shatter even the tightest of report-creator communities. Many might say – don’t use a donut chart!

Listen, you gotta admit – it has its use cases. It’s great for assessing proportional differences. It’s great for filtering. Problems arise when people try to show 50 or 60 categories within a single donut or pie chart.

To combat this, providers of Power BI custom visuals and donut charts, such as Drill Down Donut PRO, offer various solutions to the most common issues. One of the solutions is the option of adding an ‘Others’ slice.

power bi custom visuals usability others slice

Which one of these is easier on the eyes? Most would agree that they prefer the donut chart with the large grey ‘Others’ slice. 

This method helps clear up space and stops the visual from getting too cluttered by limiting the amount of information that you are showcasing to your user at a given time. This helps your user know where to look and focus on what’s relevant, instead of getting potentially overwhelmed and end up looking at miniscule numbers.

To do this, simply enable to ‘Others’ slice and set the max Number of Slices you’d wish to display to your user (not counting the ‘Others’ slice). In the example above it`s been set to 3. Afterwards the visual will pick out the three highest values, and the rest will be assigned within the ‘Others’ slice.

To keep up with the theme of interactive data visualization, the 'Others' slice, in the case of Drill Down Donut PRO, also allows the end user to click and drill down to see the categories contained within.

The Drill Down Donut PRO visual allows creators to really see the full potential of the donut chart. So, considering how we've solved one of the most popular setback of donut charts, why not give them another go;

Combo chart

The Drill Down Combo PRO visual is one of the most versatile Power BI custom visuals and can be used in hundreds of ways. All it takes is just a little bit of creative thinking on top of getting familiar with this visual’s capabilities, and your journey in interactive data visualization will go a long way.

Chart title

Starting off with the title – within the combo chart, the title can either follow your report navigation in a dynamic way, or you can force it to display only a certain text. If you type something into Title Text, it’ll keep that text on each level. If you keep it blank, the title will showcase the name of the current category that is being viewed. This helps the end-user keep track of what they are looking at. 

Power bi combo chart dynamic titles

However, this method only changes the title without showing the full hierarchy. If you want your end-user to be able to see the full hierarchy, you can combine the dynamic title method with card visuals. 

Now, we have touched on using dynamic titles with card visuals in our previous webinar recap. But as a quick reminder – having the hierarchy within sight helps the user keep track of what page or level they’re showing in a report with lots of levels. It also minimizes the risk of them getting lost by helping the report feel more intuitive.

Whatever your use case is, using titles this way can be a great standardization practice in helping your user navigate a report using any Power BI custom visual.

Stacking

Stacking columns are great for comparing targets vs. actual values. Quick guide on how to stack if you don’t already know: Every single series has a stack number. To stack, make sure they have the same number.

Now that you’ve created a stack, you can see there are three modes available: normal, 100% proportional, and zero based. All three of these have their specific use cases when it comes to interactive data visualization. Just remember to make sure you adjust the chart accordingly if necessary.

Now, stacking can show up with a bunch of problems once the available values for comparison are similar – as in one of the columns will most likely be hidden behind the other. This can turn into an awkward situation where you’re forced to explain to the end-user No, no! There’re two columns, you just can’t see the other one… So much for them getting to experience the magic of business data visualization, huh. 

power bi custom visuals drill down combo pro featuresTo avoid this, we can use the setting Width Percent. Change one of the columns to be half the width of the other column, and you get a neat effect of columns within columns, which allows the user to immediately compare both values.

power bi custom visuals drill down combo pro width percent setting

Thresholds

Threshold areas are also a great way of comparing targets vs. actuals. Once you find the Threshold Type option, change it from line to area, you can add multiple areas, designate their values from and to, and define their color, and more.

Set your thresholds under the columns, and this can be a great way to help your user quickly go by color to see if their actual values are in a bad, medium, or good area, instead of reading over the listed numbers. For even better visibility, you can change the columns to a line.

set your thresholds under the columns combo chart power bi


So, this is a great standardization practice with Power BI custom visuals – by incorporating universal signs, such as background colors, the end-user can immediately read the report. Standardization isn’t always about navigation – visuals can play a huge part in the readability of your report as well. That’s the neat thing about truly interactive data visualization.

A useful feature that touches upon intuitive navigation and interactive data visualization is a dynamic threshold line. This is a feature you'll find in a couple Power BI custom visuals like Drill Down Combo PRO. Add an additional threshold but instead of the Value Type being constant, change it to average.

The value of threshold is being calculated in real time, based on the values of the visible columns. So, if we move the chart to the left or right, or zoom in or out, you would see this line change its position, based on the average of the values of the columns visible.

userThis would allow the end-user far more flexibility when discerning averages, as they can see whichever columns they choose, and see this average immediately change, based on how they navigate. Now, that's true interactive data visualization. 

As we said, out of most Power BI custom visuals, the combo chart is an immensely powerful visual, and with Drill Down Combo PRO you can really customize every minute detail to the end-user’s liking. All it takes is some time and creativity, and your options are endless.

TimeSeries chart

Unlike Combo or other Power BI custom visuals, Drill Down TimeSeries PRO was specifically built to showcase date/time-based data. This is useful for showing progress over time as precisely as you’d like, right down to the millisecond, especially for business data visualization.

Dynamic All Data

Regarding standardization of the TimeSeries visual, you’ll find a handy tool under X-Axis called ‘Dynamic All Data’. This option becomes very useful when you have external filters.

By default, when you select a certain time interval, the columns don’t automatically resize themselves – the excess just gets hidden from view. Doesn’t sound super interactive in the world of interactive data visualization.

power bi custom visuals dynamic data for timeseries chart

Once you enable Dynamic All Data, the columns will automatically rescale themselves to fit the viewport. This will give your user and more dynamic data-storytelling experience.

power bi custom visuals dynamic data for timeseries chart

Current time

The ‘Current Time’ option creates a vertical line with today’s date at the bottom. If the end-user wants to see sales results or other such metrics, this is a great way to show them where they are at this current point in time. It might look like a small detail compared to most Power BI custom visuals, but it can help immensely in positioning the end user regarding all the progress they’ve made. You can see this being a great little feature for, let’s say, interactive business data visualization. After all, beauty is in the details.

power bi custom visuals dynamic data for timeseries chart shows current timeAnother thing that streamlines the interactive data visualization and drill down experience within the TimeSeries visual is the ability to zoom into custom time intervals.

By hovering over the X axis, you can create a custom time selection by highlighting a time interval of your choice. And by clicking on that highlighted area, the chart will zoom in to the next level of your selection.

Initial Display Unit 

And finally, within Power BI custom visuals like the TimeSeries visual, you can set the Initial Display Unit. This option determines the granularity when you first load in the chart.

Usually with time-based charts, the data can stretch out to 2 or 3 years. If the chart automatically is told to load with all the years showing, it’s not going to tell the end-user much. Best case scenario, you have about 3 huge columns showing.

Setting the Initial Display Unit to quarters or months will give the end-user a much better overview, as well as an idea on where to start their analysis process with interactive data visualization. Essentially, it’s a better way to ease the end user into your report upon first viewing.

Time is of the essence, as one might say. The Drill Down TimeSerie PRO visual, as far as Power BI custom visuals go, really allows creators to capture the dynamicity of time-based data, so your end users really see where their efforts are paying off. 

Map chart

Drill Down Map PRO is one of the most powerful Power BI custom visuals visuals on offer, as it combines geographic data with business data visualization – one of the most sought-after combinations in the age of globalization.

Base Layer Settings

To start off, the first useful ability for the Map visual is the option to define base layers. If you go under formatting options, and look at Base Layer Settings, you’ll see four settings.
More often than not, the most confusing option is ‘None’. After all, why would you want to have a map without a map? Well, if you’re only in need of high-level information, using shape layers would be enough. Just a basic outline of countries, states, cities will do – you don’t need to know about districts or other areas that deviate from the defined standard. It also goes easy on the resources used to render your report, as opposed to loading in maps.

power bi custom visuals drill down map pro

The next option is ‘Image’. This allows you to use an image of a map as the base layer.

power bi custom visuals drill down map pro image layer

 As you can see, it doesn’t have to always be a standard map. It can be a layout of a building etc. And you can still find a use for this in the realm of interactive data visualization. You can add nodes to display certain metrics. Or use the lasso tool to draw certain shapes on top of the image, and filter those out.

The map visual supports up to 10 shape layers. This means you as the creator have the freedom to create your own hierarchy. So, you can create a country layer, drill down to reveal a state layer, drill down again to reveal a county layers, and so on and so forth.

Another great thing about the shape layers is that you can also use you own custom shape files which can be provided as either a GeoJSON or KML. Simply do a quick Google search and ta-da! You have quickly acquired an accurate shape layer.

Drill Down Map PRO makes map charts more dynamic and brings a fresh perspective on visualizing geographic data by allowing the user to stay a report creator and focus all their efforts in fine-tuning the interactive data visualization experience, instead of heading into full on cartography.

Now as a reminder, this article was a recap of a past live webinar which took an even more thorough look at all the mentioned ideas and tips for standardizing your user experience with Power BI custom visuals. Feel free to check out the full recording of this webinar, and don't forget to sign up for future live demos

Click here to download the report file (.pbix)


envelope icon

Want more info like this?

Subscribe to our newsletter and be the first to read our latest articles and expert data visualization tips!


Find out more